
Impulse responses are digital copies of sonic characteristics of a guitar cab, microphone, natural space or a room’s reverberation. We have already explained in detail about what impulse responses are. Now it is time to delve into how to make impulse responses for guitar.
Impulse Responses are the perfect accompaniment for guitarists who want to get a professional guitar cab sound for studio as well as live concerts.
Table of Contents
How to make Impulse Responses using a Location (Amp, mic, room, etc.)

Creating IRs from tube amps is not new. Lugging around gigantic 100W or 200W amps is not feasible especially when you are a hobbyist guitarist who frequently plays live every once in a while.
Guitar impulse responses offer steadfast convenience as they accurately capture the sound of your tube amp and rig setup so you don’t have to carry around a heavy rig during rehearsals and live shows.
If you can create an IR file of, say your favorite amp such as a Marshall 1960A, Boss Roland Katana 100W or Fender 65 Twin Reverb 85 Watt, you can save a lot of money and storage space hassles.
By simply creating IR files of these 3 amps (we used as example), and importing those IRs into your multi-effects processor, you can recreate the exact same sound on stage without ever having to lug your precious amps around. Ingenious, isn’t it?
To create an Impulse Response file, you will need to feed the device a “test tone” or white noise created by a convolution reverb plugin or a Digital Audio Workstation software that can generate an IR file.
Of course, the type of sounds generated are dependent upon the plugins and DAW that you have used.
Next, you will need to capture the output sound by placing a microphone in front or sideways of the amp. Once the sound is captured, the plugin or DAW compare the sound they have sent with the sound they have received.
An Impulse Response file is generated based on this comparison. You can then export the IR file to use on DAW’s multi-fx guitar processors of your choice.
These IR files mimic a specific guitar cab they were recorded from.
For example, you could find or create an IR of a Fender 1965 Twin Reverb mic’d with a Shure SM57 inside a small-sized room.
These guitar IRs retain the same exact tone for all future performances whether it be jamming, rehearsals, recording or live shows.
You can create impulse responses for any kind of guitar driven music such as various subgenres of rock and heavy metal.
DAW’s such as Logic Pro X, Ableton and Pro Tools come with their own plugins to create your own custom impulse response files.
Down below we will look at some of the best ways to make guitar impulse responses inside your DAW and also help you use them.
How to make Impulse Responses for Guitar?
There are loads of free IRs available online, however creating a custom IR with a specific cab setup in mind has its own benefits.
Remember, each impulse response has its own different characteristics that are influenced by guitar, cab, preamp, mic, and different microphone placements and a gamut of other factors.
Here’s a few things you will need to get started making your own Impulse response.
- Guitar cabinet
- Preamp or Guitar head
- Microphone
- Audio interface (ideally with two or more inputs for recording multiple microphones)
- DAW or Digital Audio Workstation (if you are recording)
- Deconvolution VST/AU plugin (comes in handy for using a sine sweep to create the IR)
- For Mac users MLsTool can be quite useful deconvolution. Logic Pro X users can use the native Space Designer plugin.
- Windows users can rely on Voxengo Deconvolver.
- Studio One users can use its built-in impulse response plugin called IR Maker.
Note: You will also need an IR loader plugin (convolution reverbs have built-in IR loaders) or a floorboard processor such as Boss GT 1000, Quad Cortex, Line 6 Helix, Headrush Gigaboard, Kemper Profiler to name a few.
How to make impulse responses for Guitar: Checking Hardware
- Before you even begin recording, please ensure that you use good quality cables and a stable power connection with zero voltage fluctuations or power outages.
- Next, adjust the mic placement in your room or studio. The trick is to find a suitable sweet spot.
- Now, connect the audio interface to your laptop/desktop computer.
- Connect the microphone to one of the inputs in your audio interface.
Certain mics require phantom power. Be sure to check if your specific mic requires phantom power.
If it does, please connect the mic before turning on the phantom power on your audio interface.
- Now comes the interesting part. Select your regular guitar amplifier setup It is usually something like this: guitar > head/preamp > cabinet.
- Next, mic up the guitar cab and start recording in order to get a gist of the final sound that will become the Impulse Response.
- Lastly, connect one of your audio interface’s output to the FX RETURN of your guitar head/preamp. Now, disconnect your guitar.
How to make Impulse Responses: Software Setup
First things first, ensure that you create a custom folder in your computer in order to save the newly created impulse response files.
It is helpful for easy access for all future recording purposes.
Now that you have checked all your connections and rig setup, it’s time to finally record and capture the Impulse Response.
There are 2 methods of recording guitar cab impulse responses:
1) Sine Wave Sweep
This method has a frequency range from 20hZ to 20kHz (the human hearing range).
The resultant IR file is at least 30 seconds long at a sample rate of 48kHz, at the very least.
2) White Noise Burst
A less time consuming method of recording IR. This method relies on your DAW’s white noise generator.
Please note that whichever of the above 2 methods are chosen to record your IR, the resultant sound of the file sounds like a click.
How to make Impulse Responses with the Sine Sweep Method?
Before you begin recording IR via the Sine Sweep Method it is pertinent to turn all your monitors off.
Also, please take off your headphones while recording the sine wave to avoid tinnitus problems. Yes, the sine wave is quite loud and especially harmful to the ears.
Here’s 2 sample sine sweeps that you can use for your test:
- Open your DAW and create a new audio project.
- Next, create 2 mono audio tracks and load the sine wave sweep onto one of them.
- Now, import the sine wave onto one mono audio track and disable its input. This mono audio track will essentially be used for only playing back the sine wave signal through your guitar rig later.
- Next, Hit R (Record) on the second mono audio track as soon as the sine wave starts. For Mac and Logic Pro X users the command key will be “R”.
- Hit “R” again to stop recording a couple of seconds after the sine wave ends so as to avoid the end getting cut/truncated.
- Next, save the recorded sine wave sweep as a .WAV file.
- Now, import the .WAV file into a deconvolution plugin, and wait for it to process the sine wave.
Remember each deconvolution plugin is different and hence the timing to process the sine wave may differ accordingly.
Once the sine wave is processed successfully, a new .WAV file is created by the deconvolution plugin.
This new .WAV file is essentially your IR file.
How to make Impulse Responses with the White Noise burst method?
The white noise burst method doesn’t rely on deconvolution. Many DAWs nowadays come with inbuilt white noise generators that will come handy for this type of IR recording method.
- In case, your DAW doesn’t have one, simply look for a high-quality white noise .WAV file online.
- Now, import the .WAV white noise file into your DAW and create two mono audio tracks.
- Next, import the white noise into one of the mono tracks and disable the input. This mono audio track will essentially be used for only playing back the white noise signal through your guitar rig later.
- Cut the white noise so that only one sample in length is left.
- Hit R (Record) on the second mono audio track, then press Record on your DAW’s menu bar to record. For Mac and Logic Pro X users the command key will be “R”.
- Please ensure that you begin recording a few seconds before the white noise sample starts.
- Now make sure that you stop recording a couple of seconds after the white noise sample ends so the end doesn’t get cut/truncated. For Mac and Logic Pro X users the command will be R to stop the recording.
- Here’s the most important step: Normalize the recorded audio track.
- It is critical for ensuring you don’t risk volume loss on the final signal.
- Finally, save the normalized track as a .WAV file. This will be your newly created Impulse Response file.
How to make impulse responses: Using IRs inside your DAW
Armed with a newly created IR file, it is now time to use it and check it?
Using an impulse response is quite easy.
- Simply add a convolution reverb or IR loader plugin onto an audio track’s signal chain in your DAW.
- Import the IR file if you’re using a Multi FX processor such as Line 6 Helix, Quad Cortex, Boss GT 1000, Kemper Profiler, Headrush Gigaboard, etc.
- Next, send your guitar’s DI signal into your audio interface or floorboard processor by connecting the input cable to your guitar. Make some adjustments or tweaks if necessary and start playing. Happy riffage!
SEE ALSO: 100 Free Impulse Responses for Line 6 Helix.
How to make Impulse Responses with Ableton Live?
Creating impulse responses on Ableton Live becomes relatively easy all thanks to the inbuilt IR Measurement Tool.
This tool measures the room acoustics by sending out a sine sweep wave via a speaker.
The sine sweep wave goes through all the frequencies in the discernible human audio frequency range that is from 20 kHz to 20,000 kHz, using an exponential sweep of the audio spectrum to capture the room for an accurate impulse response.
1) Find the IR Measurement Tool
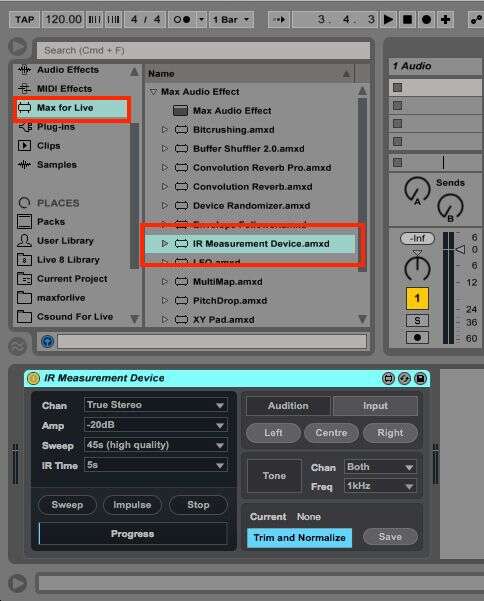
The IR Measurement Tool is a Max device that works with Ableton Suite with Max For Live.
You can use it to create your own custom IRs, which can be loaded into a Convolution Reverb.
You can find the IR measurement Tool inside Ableton here: Max for Live > Max Audio Effect.
Next, load it into an Audio Track. Then, the IR Measurement tool effectively measures the space and lets you save the impulse as an audio file in .WAV format.
How to make Impulse Responses with Ableton: Hardware Checklist
You’ll need 2 speakers (one each for a mono file), or two collectively (for stereo) to send out the sine wave.
Ideally a condenser or field recording microphone to record the audio sine sweep signal.
2) Speaker Placement
Place the speaker(s) anywhere in the room as you like. If you are unsure simply walk around the room and clap your hands to hear the various reflections and then select to decide where it is the loudest and clearest.
Next, place the microphone somewhere near the speaker where it can accurately pick up the full signal of the speaker when it sends out the sine sweep wave.
3) Recording the Impulse
- Double check your Audio Input Device inside Ableton to correctly record the audio signal.
- Record arm the audio track (mono or stereo) where the IR measurement tool is loaded. Also, set the audio track to Monitor Mode to In.
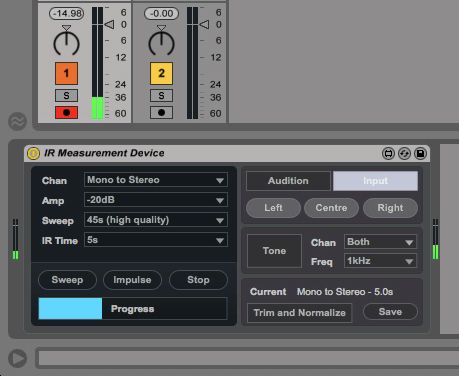
- If you are using only one speaker, change the Channel from True Stereo to Mono to Stereo on the IR Measurement Tool. Leave all the other values default as is.
- Now it’s time to pass the sine sweep. Click on Input on the right side of the plugin. Next, press the Sweep button to send an exponential sweeping sine wave to your audio track.
- The microphone will accurately capture this sine sweep wave across the entire frequency spectrum.
- You can monitor the progress made by the sine sweep via a nifty progress bar at the bottom of the IR Measurement tool.
- The progress bar will display ‘Measurement Done’ when the sine sweep is recording ends.
- You can also Trim or truncate the silence of the IR and then normalize the audio level.
- Furthermore, you can also change parameters such as IR time for longer or shorter IR durations or change the amplification.
- Next, save the impulse response and choose a location (ideally where you will save all your impulse response files).
How to make Impulse Responses: Using IRs in Ableton
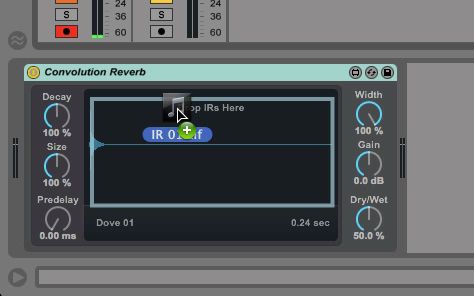
You can import these IR files into Ableton’s Convolution Reverb plugin.
This method is handy for getting an accurate impulse response of your analog device or room.
You can take this a step further and create impulse responses via the same method for natural spaces such as tunnels, stairwells, etc.
Here’s another demonstration on how to make impulse responses in Ableton.
How to create an Impulse Response of an acoustic Guitar with Ableton?
First things first, you will need 2 recordings for comparison before you generate an IR file.
For acoustic guitars, it is pertinent that these recordings are made from instruments that you will use later. Also, they must sound identical.
To apply an acoustic guitar impulse response to your electric guitar, you will need to capture the sound of an acoustic guitar with a microphone as well as capture the sound of the electric guitar directly connected to your computer’s sound card.
Likewise, if you want to apply an acoustic guitar Impulse Response to another acoustic guitar (with a different body type, brand) using a piezo pickup system, you will need to capture the sound of the acoustic guitar with a microphone and capture the sound of the second acoustic guitar using the piezo pickup system.
Remember the “sound” of the IR files generated are determined by a lot of parameters such as the body of the guitar, room where the recording is being made, the type of microphones used, to name a few.
How to make Impulse Response for Acoustic Guitar with Ableton: Equipment Required
- An acoustic Guitar and 1 electric Guitar
- Microphone to record the acoustic Guitar
- Sound card with at least one input for recording the electric guitar
- A DAW or audio editing software that can generate IR files.
How to proceed?
As explained above, a single recording of the same piece is done via 2 different recording systems.
First one requires a microphone placed in front of the instrument, while the second one is made through a piezo pickup system.
Next, wait for your DAW to compare and analyze the two audio tracks to generate an Impulse response file of your acoustic guitar.
Pro Tip:
During recording, please ensure that you cover the whole sonic palette or frequency spectrum of the acoustic guitar as well as your own playing style.
For example, if you don’t play a bend or a hammer-on correctly, the IR won’t be able to capture this specific instance into account as intended and the recreation of this technique may end up sounding bad on the newly generated IR file.
How to make Impulse Responses with Logic Pro X?
Creating impulse responses in Logic Pro X is possible with the help of an inbuilt plugin called Space Designer. This plugin is available for free for Logic Pro X users.
Space Designer can use either recorded impulse response files or synthesized impulse responses.
You can create impulse responses in Logic Pro X via 2 modes: Sampled IR mode and Synthesized IR mode.
You can press the Sampled IR or Synthesized IR buttons above the main display to change the current impulse response mode.
You can use any mono or stereo AIFF, WAV or SDII file as an impulse response.
How to make Impulse Responses in Logic Pro X with Sampled IR Mode?
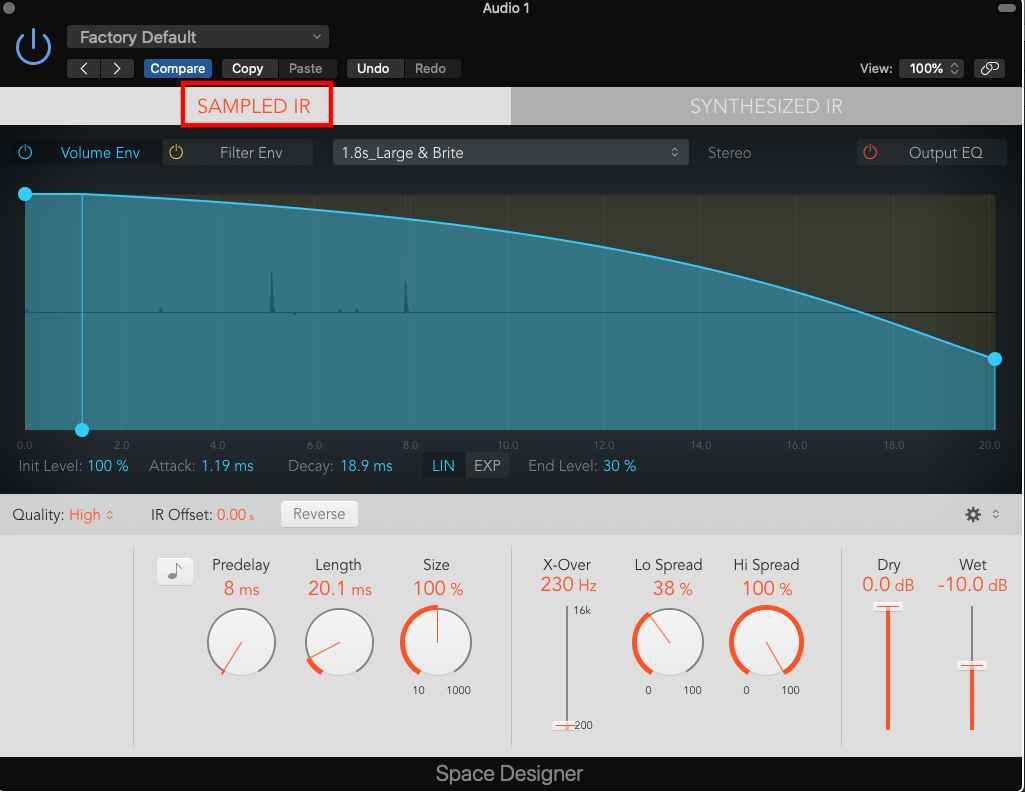
You can activate this mode by pressing the Sampled IR button above the main display.
- Sampled IR mode uses an impulse response sample to generate reverb.
- Next, a Load impulse response window will open.
- Now you need to select an impulse response file from any folder on your Mac.
- In Sampled IR mode, the Space Designer plugin loads an impulse response recording of an acoustic environment.
- This recording is then convolved with the incoming audio signal in order to position it in the acoustic space provided by the IR.
How to make Impulse Responses in Logic Pro X with Synthesized IR Mode?
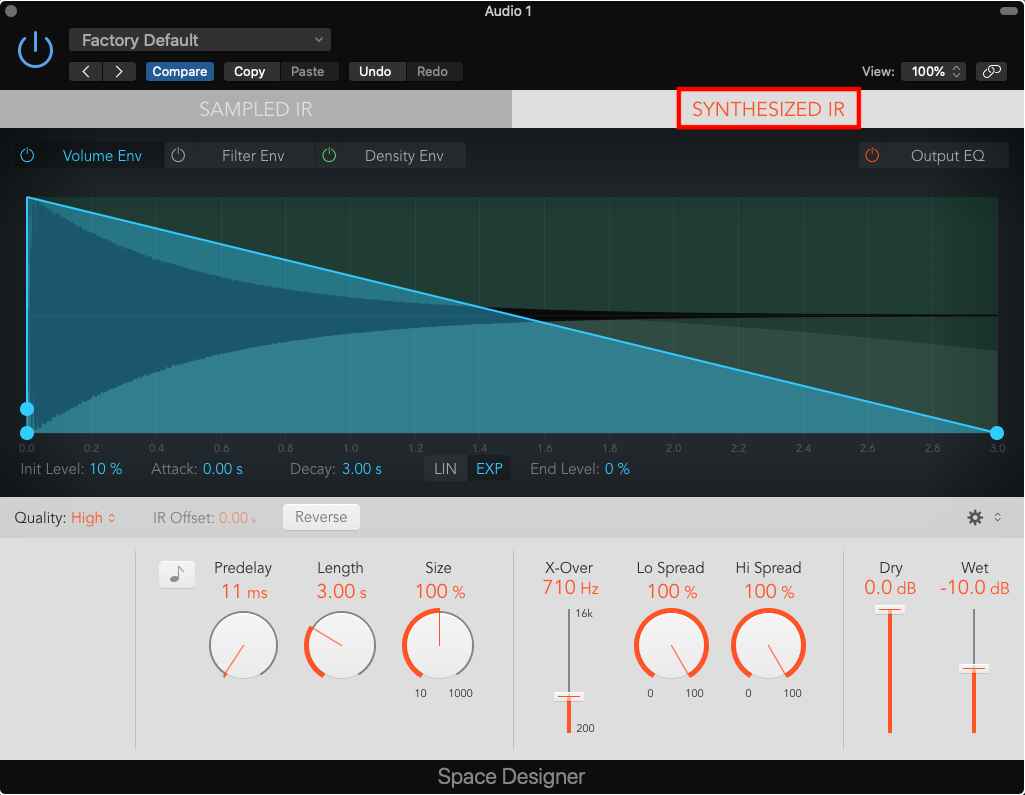
This mode is activated by pressing the Synthesized IR button.
- In Synthesized IR mode, the Space Designer plugin automatically generates a synthesized impulse response derived from the values of the Filter, EQ, Length, Envelope, and Spread parameters.
- To choose this mode, simply click the Synthesized IR button above the main display. Next, repeatedly click the Synthesized IR button and it will randomly create a new impulse response with somewhat different reflection patterns.
- Space Designer will save your current impulse response with the setting file along with parameter changes representing the current IR’s reflection patterns.
Note: If you click the Synthesized IR button while you’re creating an IR in Sampled IR mode, Space Designer will switch to the synthesized impulse response stored with the current settings of Sampled IR made.
You can also seamlessly switch back to a loaded impulse response sample from a synthesized impulse response in Logic Pro X without losing the settings of either modes.
How to make Impulse responses in Logic Pro X: Parameter Checklist
IR Sample pop-up menu: This parameter displays the name and format of the loaded impulse response.
Load IR: This parameter loads an impulse response file without changing the envelopes.
Load IR & Init: This parameter will load an impulse response sample and initialize all envelopes.
IR Utility: It is an application that enables Logic Pro X users to create their own impulse response files. IR Utility offers recording, processing and editing features for creating impulse responses.
All factory impulse responses can be found in the /Library/Audio/Impulse Responses/Apple folder. Files with Deconvolution applied have an .sdir file extension.
Reverse button: This parameter reverses the loaded impulse response and envelopes.
A reversed IR allows you to use the tail end of a sample instead of the front end.
To get precise results, make sure to tweak the pre delay and other parameter values.
Length knob and field: Modifies the length of the impulse response. This parameter can be used with the Size knob.
Size knob and field: Modifies the sample rate of the loaded impulse response file. You can also use this parameter to preserve the original length of the impulse response.
How to set Impulse Response Length in Logic Pro X?
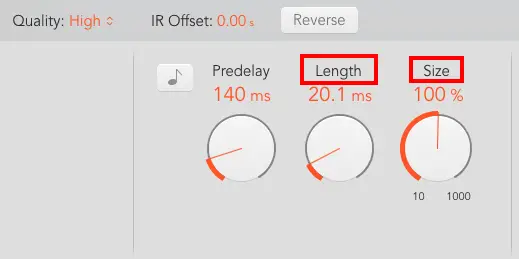
You need to rotate the Length knob in order to set the length of the impulse response in both synthesized and sampled modes.
Please note that changing Length knob parameters can affect the decay value.
For example, a Length value of 50% and a Size value of 50% can affect decay to be half the length of the loaded impulse response.
Types of IR sample rates in Logic Pro X
If you change the sample rate upwards, it increases the length, overall frequency response and sound quality of the reverb.
Conversely, changing the sample rate downwards will decrease the length, overall frequency response and sound quality of the reverb.
You can set the sample rate of an impulse response through the following modes in Logic Pro X.
Lo-Fi: Choosing this option effectively divides the current sample rate by four.
For example, if the project sample rate is 96 kHz, the impulse response sample rate will be 24 kHz. Choosing LoFi is optimal for a grainy reverb.
Low: Choosing this option halves the sample rate. For example, if the project sample rate is 96 kHz, the impulse response sample rate will be 48 kHz.
This option is suitable for making IRs of large and open spaces.
Medium: Space Designer will use the current project sample rate as the IR’s sample rate.
This option is preferred because it can automatically convert the sample rate of a third-party external IR to match the current project sample rate.
For example, choosing the Medium mode allows you to load a 96 kHz impulse response into a project running at 48 kHz, and vice-versa.
High: Space Designer will use the highest possible sample rate for an IR file in this mode. High is optimal for a smooth and clean sounding IR.
You can select a favorable sample rate by tweaking the Size knob value to reduce CPU processing time as well as preserve reverb quality.
Conclusion: How to make Impulse Responses
And that’s it folks. We laid down the nitty-gritties of creating an impulse response in your home or studio.
If you are a DAW user with Ableton Live or Logic Pro X we pretty much covered all the essentials.
We hope you liked our detailed guide on how to make impulse responses for acoustic, electric and bass guitars for free.
You can create as many Guitar IR’s using the aforementioned methods for any genre be it rock, metal, jazz you name it.
In our next post, we will share a guide on how to make impulse responses through a third-party software on any DAW.