
Want to learn how to use a compressor plugin in your DAW? You have come to the right place.
We have done a comprehensive rundown on various types of modern audio compression techniques and some secret ways through which you can use them right inside your DAW.
Whether you want to use a compressor on your channel track, mix or master track, a Compressor is a very vital part of music production.
Amateur producers often make the mistake of applying little to no compression. In some cases, the compression is dialed in to the extremes leading to no breathing space in your mix.
Fret not, down below we delve into the nitty gritties of applying sublime compression that will make your mixes sparkle with just the right amount of loudness akin to professional mix and mastered tracks.
Table of Contents
How to use a Compressor in music production? Common parameters Explained
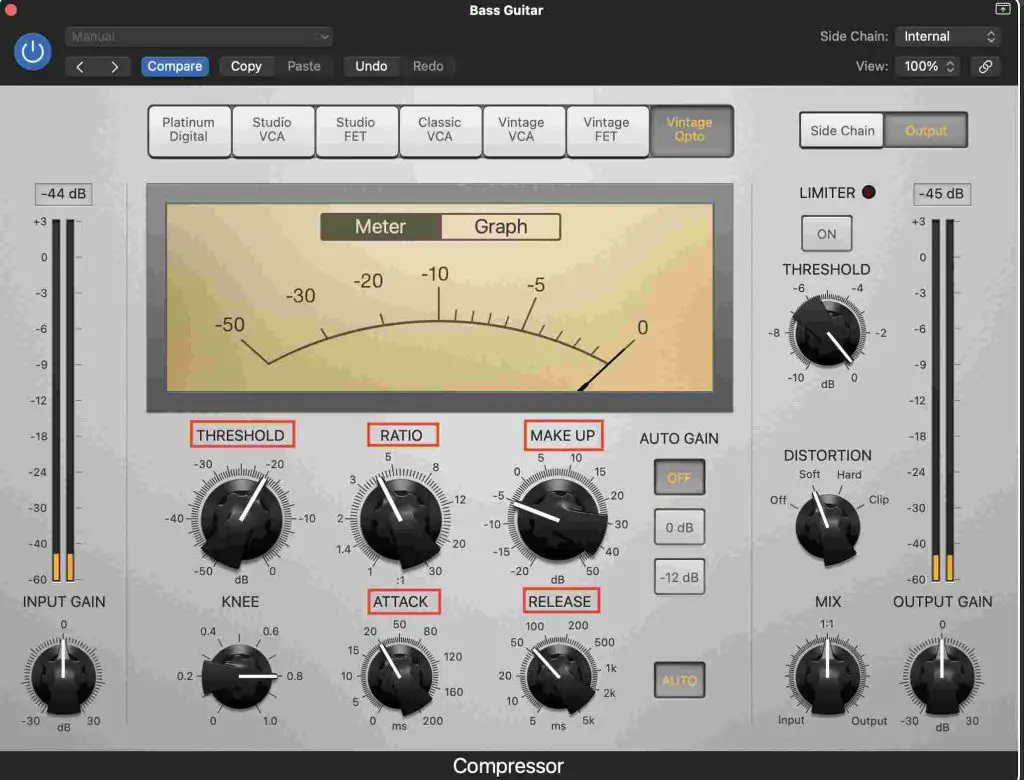
Ideally, modern compressor plugins come with 5 standard parameters namely: Gain, Ratio, Attack, Release, and Threshold.
You can tweak these knobs to dial in the desired compressed tone. But, how does one figure the ideal compression range when dealing with these parameters? Let’s find out.
Ratio
For starters, Ratio determines the amount of compression (or gain reduction) that will be applied to the instrument channel track, mix or master track.
Ratio balances the relationship between the input signal and output audio signal. Generally, Ratio ranges from 2:1 to 10:1 (where it starts working as a Limiter).
Hence, at a ratio of 2:1, an incoming input signal is being reduced by a factor of 2.
Likewise, a 2 dB input signal will output at 1 dB and an input signal of 8 dB will output at 4 dB, and so forth.
All in all, Ratio determines the amount of reduction or compression of volume.
Threshold
However, a compressor doesn’t initiate compression until the input signal goes above a custom set threshold. This is where the Threshold parameter comes into the picture.
For instance, if you set a compressor’s threshold to -10 dB, all transients below -10 dB will not be squashed by the compressor.
Likewise, any sound/audio frequencies louder than -10 dB will be acted upon by the compressor as it applies gain reduction.
Ideally, compression is used to attenuate loudest peaks in an audio track. Hence, setting a threshold for attenuating the loudest peaks makes the track consistent and level with the mix.
Please note that setting too high a threshold will not apply any kind of compression.
All in all, Threshold tells the compressor when to start compressing incoming audio signal.
Gain
Gain or makeup gain is the gain that a compressor VST adds to compensate for all the gain reduction to squashed transients applied by Ratio.
Generally, the makeup gain should be increased until the output level is equal to input level.
Of course, you can crank the makeup gain even more to increase the loudness of the track without affecting the attenuated transients.
Attack
Attack refers to the time range (denoted in ms/seconds) at which compression kicks in.
Attack controls the time taken by the compressor to apply gain reduction after the input signal crosses the set threshold.
For instance, if you set the attack time to 8 ms, it will take 8 ms until gain reduction kicks in after the input signal passes through the -10 dB threshold used in the example above.
Each instrument, channel track, mix and even tempo can have a varied attack time and there is no one size fits all approach applicable here.
Ideally, a slower attack time in the range of 20 and 35 ms works great in most situations.
Then again, if you want to squash transients of highly distorted guitar, fast picked arpeggios, selecting a fast attack time is advisable.
Release
Release refers to the time at which applied compression stops (denoted in ms/seconds).
In other words, Release parameter denotes how quickly the compressor turns off after the incoming audio signal goes below the set threshold.
Typically, a release time of 60 ms is considered a good starting point. You can always tweak around to adjust release time based on your track, tempo, or mix’s bespoke needs.
Types of Compressors
There are several types of compressors that are used in modern music production that run the gamut from Multiband compressors, Sidechain compressors, DeEssers or Distressors, Vari-Mu compressors, SSL Compressors to Opto Compressors, FET compressors, Bus Compressors, and VCA compressors.
You can use premium compressor plugins or free compressors to accomplish any type of compression on your individual tracks, mix, or master tracks.
You can check out this list of some of the best compressor plugins for compressing rhythm and lead guitar tracks.
How to use a compressor VST plugin in your DAW?
You would want to start working with a single compressor on a channel instrument track such as bass guitar and branch out from there into bus compression and more.
The moot point would be to reduce unpleasant gain, squash noisy transients, and yet maintain the overall loudness of the track at a professional level.
You can use a bass compressor and start out with the standard 4:1 ratio with medium or fast attack, and set medium release.
Usually, bass guitars sit at the centre of the mix. So, compressing a bass track should be relatively easy.
Further, you would want to tweak around with the threshold. Let’s start by setting a threshold for approx 3 to 5 dB of gain reduction and customize from there.
Not to mention, you would want to consider where a compressor is placed in a signal chain. Check whether it is placed after or before EQ, noise gate, and so forth.
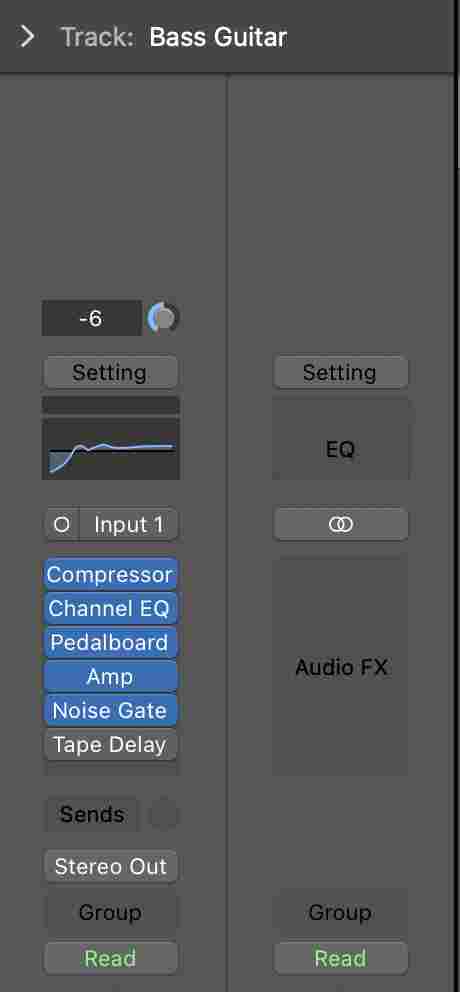
Adjusting the position of the compressor will require some tweaking and will certainly take some time for you to discern the right balance.
For instance, in a stock signal chain, a post EQ compressor will affect the way the bass guitar track is handled by the compressor.
Conversely, if you opt for a pre-EQ compressor and let it operate on a non-processed bass guitar track, you may tweak the EQ and still not affect the compression settings.
At the same time, you can also try using 2 different types of compressors on a single instrument track. This is done via compression in stages.
How to use a Compressor VST: Compression in Stages
You might be wondering whether using 2 compressors on a single track would be an overkill? Not quite.
For instance, you can use a FET compressor on a drum track and use a bus compressor on the entire drum bus as well.
Alternatively, you could use 2 different compressors on a single instrument track such as bass guitar.
This technique of using 2 or more compressors in a single track is called serial compression.
The idea is to find a suitable dynamic range control. For example, instead of opting for a straight -8dB gain reduction with a single compressor, you can use 2 or more compressors to attenuate 3 dB each.
Doing this has many benefits and the first and foremost is reduction of sudden and unnatural compression that is discernible to ears.
SEE ALSO: Check out these free Sidechain compressorsHow to use a compressor VST: Multiband compression
How to do Multiband Compression
Multiband compressors split an instrument track into different frequency ranges that are known as bands and offer granular control to compress each band independently.
A multiband compressor VST allows you to compress a specific part of a track’s frequency band, and apply different flavors of compression to frequency ranges within the band.
Pro tip: Never use Multiband compression on a mix bus as it can be a massive problem to split a mix into various frequency bands and process them separately.
So, where is Multiband compression best suited for? On individual tracks, such as lead guitar, bass guitar, and vocals. Multiband compressors offer a great deal of automation as well.
How to use a compressor: Multiband compression
- Start with a single frequency Band.
- If you’re using a plugin such as Fab Filter Pro-MB, add one band. Remember, Pro-MB doesn’t have an active band upon launch.
- Tweak the Crossover Points by soloing the band and play the track once again to hone in on the problem that you want to fix. Remember, the band should be narrow to exclude mellow frequencies. At the same time, it should be wide enough to capture sibilant frequencies.
- Next, tweak the threshold until the band starts compression when the sibilance gets too loud.
- Now, you can control the range and ratio parameters to smoothen out loud frequencies.
- You can also alter attack and release times to balance out the compression and keep the dynamics of the audio track intact.
Conclusion: How to use a compressor plugin in your DAW
Learning how to use a compressor plugin is the first step towards learning the ropes of music production. Next frontier is using how to use an EQ. We will talk about EQ’ing in our upcoming series.